WW2 HQ Ships and HQ Assault ships shared the task of
implementing the detailed plans for large scale amphibious landings onto
unimproved beaches in enemy occupied territory. They
achieved this through a complex communications network
that
allowed
them to
monitorthe progress of the
battle against the plan and to direct the coordinated operations
of the Army, Navy and Air Forcein the light of
fast moving events. They
were floating, effectively, Command and Control Centres with the capacity to communicate with aircraft,
ships, shore establishments and units operating in the battlegrounds.
Philip Zieglar wrote in
Mountbatten's official biography, "One of the more
valuable gifts, which Mountbatten endowed on Combined Operations, was the HQ Ship.
It may seem obvious today that a massive and complex amphibious operation needs
to be controlled from a vessel, which remains offshore after the landing, which
is not liable to be removed to take part in some naval operation and into which
all the communications from land, sea and air are channelled."
Mountbatten certainly claimed to have discussed the idea with his, then
Assistant, Fleet Wireless Operator, Michael Hodges in the 1930s but it was not
until the ill fated attack on Dakar in 1940, that the need for an independent
floating command, control and communications centre was fully understood.
General Irwin wrote, "Seldom have I felt so impotent, as during this expedition,
when I was separated from my forces and tied to any naval operations which
might become necessary. The Commander of any such enterprise must retain his
independence from the fleet."
In any event, the idea of HQ ships was taken up by Combined Operations HQ (COHQ).
Mountbatten cajoled the Ministry of War Transport into
supplying a vessel to develop the concept. HMS Bulolo,
a former Australian Passenger ship of 6,400 tons, was stripped of non essential
equipment and refitted with communications equipment and control room
facilities. The work was completed in the summer of 1942, by which time the
conversion of a second HQ ship, HMS Largs, was underway.
HMS Bulolo
- an account by Edward (Ted) Pierce, who served on
the Bulolo.
I joined
the Royal Navy in November 1941 and was drafted to HMS Glendower, a shore
based training establishment at Butlins Holiday
Camp, Pwllheli, where I learned basic seamanship. A few weeks later, I attended HMS Valkyrie
in Douglas, Isle of Man for training in naval Radio Direction
Finding (RDF), an early form of Radar.
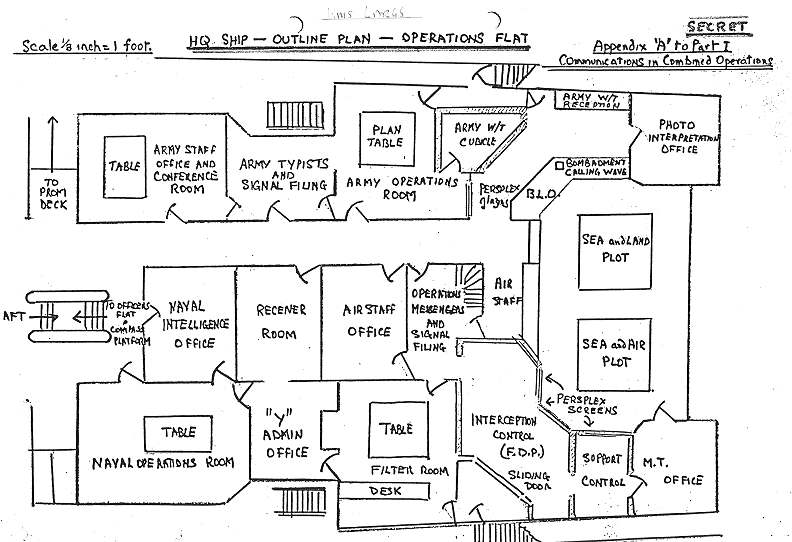
[A typical layout of the Operations Flat on an HQ ship where signals were
interpreted and orders issued. Note the proximity of Army, Navy and RAF staff -
a perfect example of a Combined Operation. Many of the sections in the plan are
fully described on the Fighter Direction Tender web page.]
After six weeks training, I had become
an Able Seaman, RDF. I was drafted to HMS Bulolo in the Royal Albert
Dock, London, where it was undergoing conversion from an armed merchant cruiser to the first ever Combined Operations HQ ship.
Admiral Mountbatten, who had been appointed to
head up the Combined Operations Command in October 1941, had been instrumental
in championing the role of HQ ships in amphibious warfare and I was to take part
in the early use of seaborne Radar.
By June 1942, Bulolo was engaged in sea trials off the coast of Scotland,
during which Mountbatten came aboard to learn of progress first hand. Before long, signals
personnel from Army and RAF units joined the ship’s company together with additional Naval officers and
ratings. The RDF ratings were responsible to a Canadian
'green-stripe' sub-lieutenant and a leading seaman RDF by the name of Tom
O’Carroll. He had served on a Flower Class corvette, where he had earned a DSM
for detecting a U-Boat, which lead to its sinking.
Our first operation as an HQ ship was the
invasion of North Africa, codenamed Operation
Torch. The convoy comprising 300 ships departed various UK ports around the
end of October 1942,
sailing under the flag of Admiral Sir Harold Burrough in Bulolo and destined for
Oran and Algiers. Also on board were high ranking officers from all three
services, British and American, including Generals Ryder and Mark Clark.
The voyage was uneventful but, after passing undetected through the
Straits of Gibraltar, we came under attack from enemy aircraft.
Nevertheless, successful landings were made and in due time Bulolo proceeded with imperial dignity into Algiers harbour.
Unfortunately, as Commander Anthony Kimmins reported in his BBC broadcast that
night, all did not go well, "while approaching the harbour that morning, Bulolo
had been heavily dive-bombed by Hun aircraft. A near miss had rendered the
telegraph indicators, linking the bridge to the engine room, out of action. As there had been no occasion
to use the telegraph between then and coming into harbour, there was no reason to
suspect they had been damaged.
Now, as the captain rang down ‘Stop - Half astern
- Full astern’ the engineers below were blissfully unaware that they had been
given any orders. Luckily a sandbank and some rafts broke the impact but Bulolo
hit the concrete jetty a tremendous crack before finally coming to rest."
Having visited Algiers a couple of times since then, I can testify that the dent
in the jetty wall was still there!
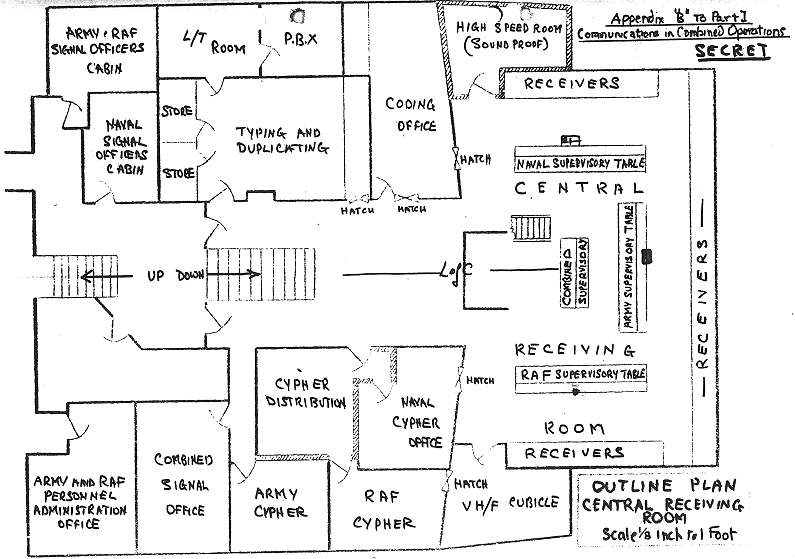
[A typical layout of the room through which incoming radio
signals were received via the array of aerials on deck.]
During the following days,
Bulolo was the centre of activity for the initial
political and military negotiations with the Vichy French authorities (Darlan,
Giraud, etc) and it provided the vital communications link with the American
forces in Casablanca.
After four weeks alongside in Algiers, we
returned to the UK in time for Christmas leave. But Bulolo's North African duty was not quite over. The
Casablanca conference was scheduled for early January 1943, when Churchill and Roosevelt were to discuss plans for
the next stage in the war.
Churchill suspected Roosevelt and his advisers
would be loathe to accept his (Churchill's) wish to continue with the Mediterranean campaign.
They viewed it as an unnecessary diversion that would delay the main invasion of Europe.
Here I quote from an account
of these events by Rick Atkinson in his book An Army at Dawn. ‘ To
help build his case, Churchill had ordered Bulolo to attend at Casablanca. With
its war room full of planning studies bound in red leather dispatch folders,
Bulolo symbolised the British empire’s formidable bureaucratic firepower’.
Here, the British chiefs would lobby their American counterparts, all issues
would be discussed fully and the relentless British logic would win through.
Those red leather folders would reveal ‘wondrously precise studies and
statistics’ in support of Churchill’s strategic arguments! Bulolo’s
intellectual contribution to history seemed secure!
By the time of the ill-fated Dieppe Raid on 19 August, 1942, the idea of HQ
ships had taken hold. For this operation, three Hunt Class Destroyers were
designated HQ Ships.
HMS Calpe
was the main HQ ship, from which Canadian, Major General,
H F Roberts, MC, commanded the assault force and Captain J Hughes-Hallott, RN, commanded the
naval element. Also on board was WW1 veteran airman, Air Commodore
Adrian Trevor Cole, CBE, MC, DFC, of the Royal Australian Air Force. He controlled the air operations
above the raid
from a forward vantage point. Suitably qualified service personnel drawn from
the three services manned the various communications and control room functions.
HMS Berkeley
was crewed to operate in support of HMS Calpe.
It controlled low fighter cover squadrons under Acting Squadron
Leader, James Humphrey Scott, RAFVR. Berkeley was also designated "First
Rescue Ship".
HMS Fernie
was the reserve HQ ship if either of the other
two became disabled. Prior to her departure
for Dieppe, her battle cry was played over her loud hailer, the sound of which echoed across the
harbour waters to the embarking troops
on the jetties.
Operation Jubilee
commenced in the late evening of 18 August, 1942. The flotilla comprised over
230 ships assembled from ports along the south coast of England. It was a warm,
moonless night as the ships headed across the channel to Dieppe. Radar stations on the English coast picked up "unidentified
vessels" and twice, at 01.30 and again at 02.30 on 19 August,
they radioed warnings to the naval commander, Captain Hughes-Hallet. These
warnings were not acknowledged and the raiding force took no evasive action. The
force commanders were, therefore, unaware they were on a collision course with a
German convoy proceeding from Boulogne to Dieppe.
The
main assault troops were carried in large ships with their LCPs (Landing
Craft Personnel) hanging from davits. Most of the commandos made the crossing in
their own LCPs, each of which held about 20 men, while the tanks were carried in their own LCTs (Landing Craft Tanks)
with 3 tanks to each LCT. Just after 03.00, the first shots of Operation Jubilee were fired as troops, in the larger ships, were
loaded into their LCPs and lowered into the water for the long run in to the beaches. The
"point of no return" had been reached.
As the action proceeded, Flt/Lt Kidd noted that the Berkeley was hit at 12.45 and began to sink
immediately. HMS Calpe and some smaller craft transferred most of the crew
and service personnel from the vessel and picked up others from the sea. The Berkeley's Captain,
Lt J J S Yorke, RN, and most of his men, survived. Shortly after 13.00, HMS
Albrighton torpedoed the Berkeley and she sank at 13.08.
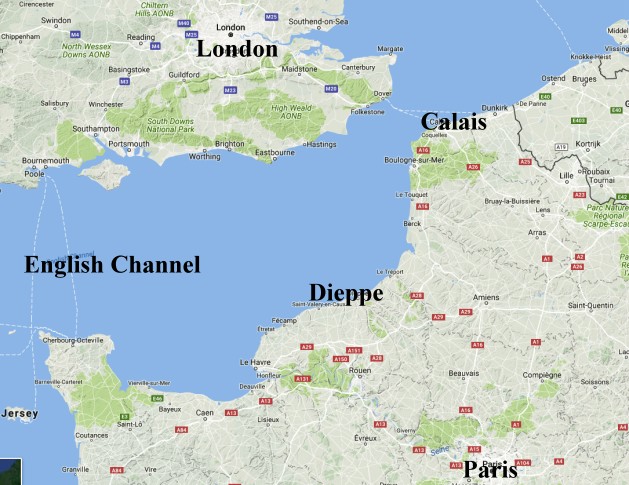
[Map courtesy of Google Map Data 2017.]
HMS Calpe was attacked and bombed by 3 Dorniers,
which approached from the west at 8,000 ft. They released their bombs at 6,000
ft while Calpe
was undertaking a slow manoeuvre, searching for a downed pilot. Although
there were no direct hits, the blasts damaged the ship's stern, causing some
fatalities
and blowing six more overboard. They were rescued by SGB 9, a gunboat under
the command of Lt Peter Scott DSC, who was later to become a famed naturalist.
Immediately afterwards, a Folke Wulf 190 approached from the east and strafed
the starboard side of the destroyer, hitting the bridge with cannon fire, killing an Oerlikon
gunner and wounding Air Commodore Cole. He was not the only Air Force casualty
that day aboard the Calpe and the Berkeley. On the
latter, Wing Commander, Stanley Skinner, DFC, Observer for the raid, was killed. He
was a former night-fighter pilot with 604 Squadron. His American counterpart, Col LB Hillslinger,
lost a foot in the action.
The Dieppe Raid
was a disaster for the assault forces but there were also problems at sea. From an altitude of 25,000
feet (about 4.5 miles), pilots of the RAF patrolling the area at around 13.00 could
see the ships at the end of the withdrawing convoy coming under enemy air
attack. They reported that HMS Berkeley was in trouble and requested, via
the Hornchurch controller, that the 'Cover Squadrons' be concentrated in that
area. They also contacted HMS Calpe, recommending that the lower cover
squadrons be directed over the
Berkeley. [For reasons not entirely clear, it seems
that the RAF were unable to respond to these requests.]
A few days after the raid, Flt Lt, Gerald Le Blount Kidd, RAFVR, Close Support Controller aboard HMS Calpe,
reported "Communications worked excellently throughout and great credit is due to
Flight Lieutenant Hall for his work in this connection. He also rendered
invaluable assistance throughout the day as liaison officer between Air
Commodore Cole and me and in other capacities. However, no signals were received by me from Uxbridge, so that it was not known what
targets had been accepted and what squadrons were on their way.
The view the Controller had from the bridge was excellent and invaluable in exercising control over aircraft. HQ ships I and 2 were often a
good distance apart. As there were no fighters under the direct control of HQ 1,
interceptions could not be made in several instances. Difficulty was experienced
in locating the fighters actually under ship control. It was noted that aircraft
in loose pairs and fours had a much better chance of making interceptions than
aircraft in Squadron formation. (This was seen only once). Fighters rarely, if
ever, saw enemy aircraft before they were warned by the Controller. Too often
they were down sun of the convoy and too low and the attacks would be made from
up sun and above. Fighters were often too low and got fired at by the convoy
gunners, who were naturally very light on the trigger. There was a lot of RT
chatter between aircraft. As things turned out, this did not matter but, if closer
control of close support squadrons, or control of fighters, had been required,
intercom would have to be cut to a minimum. Close support at Dieppe had little apparent effect on the houses, which were
evidently reinforced.
My aircraft recognition was
very weak indeed but it was essential that controllers doing this type of work should be adept. It was observed
that enemy aircraft were often chased home by large numbers of our fighters,
many of whom could have had very little hope of catching up. Cover over the
convoy was left very thin on these occasions. Excellent co-operation and
assistance was, at all times, received from Squadron Leader Sprott on HQ 2. Apart
from the fact that, owing to the unforeseen strength and preparedness of enemy
resistance, the objectives were not gained and casualties were high. Nevertheless,
viewed as a Combined Operation, the raid was a success of timing and close co-operation between the services.
The next combined attack will have a much
better chance of success as a result of the great deal of experience gained by
all who took part. Much gratitude is felt for the pilots who looked after the
convoy with such tireless resolve, from the moment of first light until after the
weather had closed down and for the organisation and pre-planning that made
that possible. The Navy's efficiency and courtesy was much appreciated and the
calm and cheerful
courage of the Canadian Officers and men was an inspiration."
The amphibious part
of Operation Overlord was code named Operation
Neptune. The organisational details below puts the complex command structure
into context with references to the many
different forces involved.
Allied Naval Commander in Chief Expeditionary
Force (ANCXF)
Admiral Sir Bertram H Ramsey
| Chief of Staff
Rear Admiral George Creasy
| Chief Naval Admin & Flag Officer British Assault Area (Designate)
Rear Admiral James Rivett (CARNAC)
| Rear Admiral Mulberry & PLUTO
Rear Admiral William Tennant
|
[We believe that the line of Command to the
Bombarding & Follow Up Forces and Administration (see below) was direct from the
above and not through the Task Force Commanders. We'd like independent
verification of this before being more assured on this point.]
Eastern Naval Task Force
- Rear Admiral Sir Philip Vian on Cruiser
HMS Scylla
Western Naval Task Force
- Rear Admiral Alan G Kirk USN on Cruiser
USS Augusta
Assault
Forces
Force S (Sword) -
Rear Admiral Arthur Talbot on HQ Ship
HMS Largs
Force J ( Juno) -
Commodore 1st Class George Oliver RN on HQ Ship
HMS Hilary
Force G (Gold) - Commodore 1st Class Cyril Douglas-Pennant RN on HQ Ship
HMS
Bulolo
Force O (Omaha) - Rear Admiral John L Hall Jnr on HQ Ship
USS Ancon
Force U (Utah) - Rear Admiral Don P Moon on HQ Ship
USS Bayfield
Bombarding Forces
Force D (Force S) -
Rear Admiral Wilfred Patterson -
Cruiser
HMS Mauritious
Force E & Force K (Force J & Force G)
-
Rear Admiral Frederick Dalrymple-Hamilton
-
Cruiser
HMS Belfast.
Force C (Force O) -
Rear Admiral Carelton F Bryant USN -
Battleship
USS Texas.
Force A (Force U) -
Rear Admiral Morton L Deyo, USN -
Cruiser
USS Tuscaloosa.
Follow Up Forces
Force B
- Commodore C D Edgar USN Force L - Commodore Rear Admiral William Parry on Destroyer
USS Maloy
Administration
Flag Officer West -
Rear Admiral J Wilkes USN Commodore Depot Ships Commodore 2nd Class Hugh England RN on Cruiser
HMS Hawkins Naval Officers in Charge (Ashore)
Sword
Cpt WRC Leggat RN,
Juno
Cpt Colin Maud RN,
Gold
Cpt George Dolphin RN,
Omaha -
Cpt Camp USN,
Utah-
Cpt J E Arnold USNR.
The positions of the 5 main HQ Ships (one for each landing beach) are marked
on the D-Day map above.
For
the Normandy landings there were 3 main categories of HQ ships, each with a range
of tasks appropriate to their function and status. The HQ Ships were
concerned with monitoring progress of the invasion against the overall plan and
directing changes in the light of the battle progress; the
Assault HQ Ships were concerned with providing support over a local
area and were in radio contact with the troops ashore and the Non Assault HQ
Ships were allocated "stationery" tasks such as accommodation, repairs,
engineering and depot.
The latter acted as mobile or
fixed bases for other ships, landing craft, submarines or small craft or in
support of a naval base. They were either specifically designed for their purpose or converted from another
use and were especially useful as bases for submarines, fast attack craft or
small minesweepers, which had little space for the crew to relax.
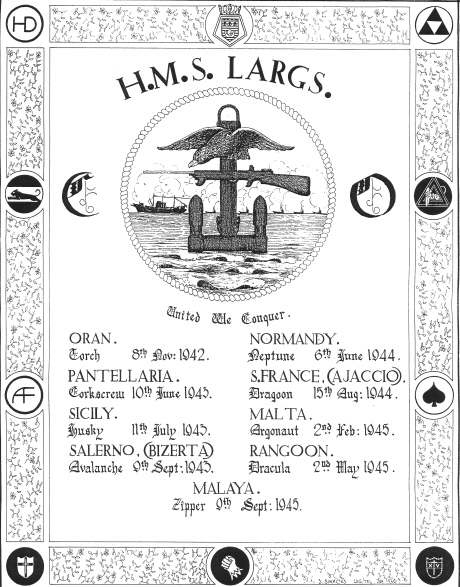
[HMS Largs images courtesy of Jim Rolt and The Largs
Association.]
In the Eastern Task Force, one HQ Ship was assigned to each of the three
Assault Divisions. The ships were positioned seaward of the beaches as follows: off
Gold beachwas HMS Bulolo with Naval Assault Force G carrying the Divisional
Commander of the 50th Northumbrian Division; off Juno beach
was HMS Hilary
with Naval Assault Force J carrying the Divisional Commander of the 3rd Canadian
Infantry Division and off Sword beach was HMS
Largs with Naval Assault Force S carrying the Divisional Commander of the
3rd British Infantry Division.
There were 3 Standby HQ ships;
HMS Albrighton, HMS Royal Ulsterman and HMS
Dacres.
Duties
and Responsibilities
The functions of the ships were;
to act as Flag Ship to the Naval Commander of the assault force
concerned,
to accommodate the (Army) Military Commander of the assault force
concerned and his staff,
to accommodate the (RAF) Air Staff Officer representing the
Commander of the Advanced Allied Expeditionary Air Force (Advanced AEAF) based
at Hillingdon House, Uxbridge.
The Advanced AEAF was a relatively small
operational organisation, through which air activity over the assault area was
controlled and coordinated. On board each HQ Ship the Air Staff Officer had a Group Captain, a Wing Commander
and a Squadron Leader Signals Liaison Officer to assist in their duties, which
were;
to keep the Commander of the Advanced AEAF informed of the
intentions and requirements of the Navy and Army Commanders,
to give the Military Commander on board advice on requests for
immediate air support or tactical reconnaissance received over the Army
support channel,
to give advice to the Naval Commander of the Force on air matters
generally but specifically on the use and control of AA fire 24/7 and smoke
over the anchorage at night,
to keep aircraft scrambled in response
to a request for immediate support updated on changes in the support
originally requested,
maintaining a listening radio watch for support aircraft arriving
over the assault area as part of pre-planned operations,
on behalf of the Military Commander receiving reports over the radio
from aircraft,
providing feedback to the co-ordinating Fighter
Direction Tender (FDT 217) on the effectiveness of the fighter cover
provided by the three FDTs,
as appropriate, making representations to the Naval Commander of the
Force concerned about the anchorage position of any FDT in his area insofar as
its position affected its operational effectiveness,
as required, directing fighters by visual control on instructions
from the co-ordinating FDT,
maintaining a listening watch for 'naval bombardment spotting
aircraft' and issuing instructions to them in the event communications were
lost with the bombarding ship concerned,
representing to the Naval Commander any special requirements of the
Air/Sea Rescue Services from naval vessels.
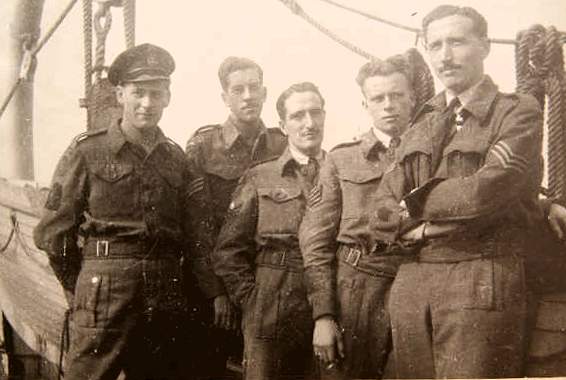
[Photo right, courtesy
of Liz Whickam. It was taken on board HMS Hilary as she entered
Portsmouth harbour on July 1st 1944. The men are l - r: PO 'Tug' Wilson, RN;
Sgt 'Dago' Allsop, Royal Corp of Signals; Flt Sgt 'Timmy' Newman, RAF, Sgt
'Sandy' Powell, RAF and Sgt Reginald 'Wick' Wickham, RAF.]
The pilots also reported back to the HQ ship on the result of their mission for
the benefit of the Military Commander on board. The HQ ships continued to act as forward control for support aircraft until a
fully operational Group Control Centre had been established in the territory
previously held by the enemy. The three HQ ships continued to operate off the beachhead for a number of
days after D+7, by which time the Air Staff contingent had left as the front line
moved inland. Thereafter the ships' functions were mainly Naval in nature.
The delivery of this formidable list of tasks
was challenging and required many different organisations, a large range of
sophisticated high tech equipment, well trained personnel and a communications
network second to none.
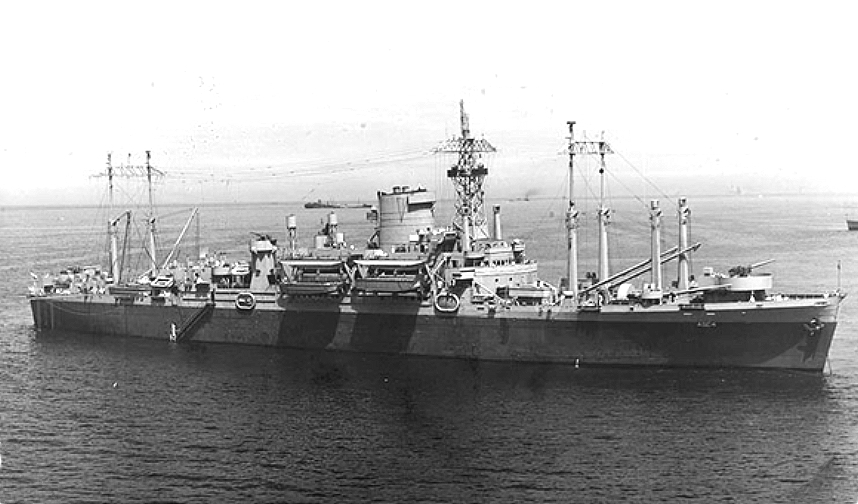
[USS Ancon Flag ship & HQ ship for Omaha beach.]
The organisation and technical equipment
available to the invading force included; the Combined Control Centre
at Uxbridge, which came under the
overall direction of the Commander, Advanced AEAF (see below) under the Air
Officer Commanding No 11 Group, in full collaboration with the Commanding
General US
IX Fighter Command and with representation of the US VIII Fighter Command.
The Uxbridge centre
was manned by both British and US personnel and was situated in the Operations
Room of No. 11 Group, Air Defence of Great Britain, with all the
facilities of this organisation available to them, augmented during the assault phase by
additional communications to US Fighter Units and Fighter
Direction Tenders at sea. The Control Centre planned, coordinated and
controlled all fighter operations and was, in addition, responsible for issuing
executive instructions for Fighter/Bomber operations.
Allied Expeditionary Air Force (ASAF) or Allied Armies' Expeditionary Air
Force (AAEAF). As the name suggests, this was a special organisation to
coordinate Allied air activity over the invasion fleet, landing beaches and
battle grounds. The aim was to achieve the best use of the Allied Air Forces
during the invasion. To achieve this, the AEAF was established at Hillingdon House,
Uxbridge. It was under the general direction of the Commander-in-Chief,
with the Commander AEAF directing and co-ordinating operations of the Ninth US
Army Air Force and the RAF Second Tactical Air Force. However, it failed to be
the controlling HQ for all Allied air forces, since RAF Bomber Command and the US
Eighth Air Force were retained by their national command authorities. For a time,
it was brought under the control of the Supreme Headquarters Allied
Expeditionary Force (SHAEF) but later disbanded when Leigh Mallory was reassigned to
the far east.
Type 15 GCI Radar. The normal mobile GCI
station operating on the 200 megahertz band was very vulnerable to enemy radio
jamming by 'window' (see below) but it was still the best
instrument for the control of night fighters when jamming was not present.
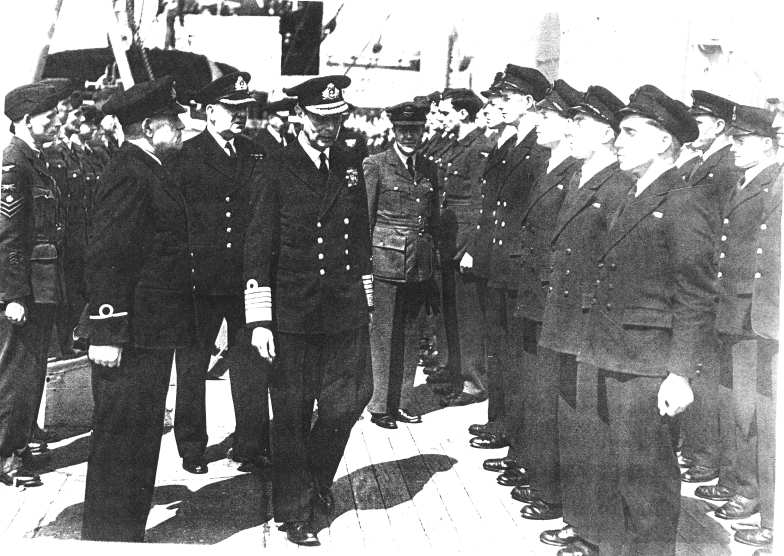
[Photos right & below, of HM the King visiting HMS Largs courtesy of the late
Sid Windebank.]
Type 11 Station.
This radar operated between 500 & 600 Megahertz and could be changed within
the frequency range in 5 to 10 minutes. This made it less vulnerable to enemy
jamming and its narrower beam width gave it better discrimination when the enemy
dropped 'window'. Because its performance was inferior to Type 15, it was mainly used as a
standby radar.
Window.
The effectiveness of radar could be seriously compromised by saturating the sky
with metallised paper strips cut to half the length of the target radar
frequency. They produce spurious echoes on radar screens, making it extremely
difficult to interpret the data and identify the approach of aircraft.
Army Signals Support Unit (ASSU).
This was the radio channel provided for HQ Ships to pass calls from troop
commanders on the far (enemy) shore to the UK when they required air support. It
was an Army responsibility.
Talk Between Ships (TBS).
Operating between 65 and 85 Megahertz, this naval VHF/RT point to point
equipment was used for communications between the HQ ships, FDTs and the
Combined Control Centre at Uxbridge.
Group Control Unit.
A mobile unit of 4 vehicles which, when set up, formed a square around an
operations table to control fighter aircraft in support of ground forces. The
unit received plot information from mobile radar equipment, which was
relayed to plotters at the table by W/T. There were also facilities within the
unit for planning, intelligence gathering, Army Liaison and Movement Liaison.
Plan Position Indicator (PPI).
The PPI was a cathode ray tube, which gave indications in azimuth through 360
degrees and varying range scales.
Azimuth (navigation)was the angular distance usually measured
clockwise from the north point to the intersection with the horizon of the
vertical circle passing through a celestial body.
Radio Counter Measures
were designed to decrease the effectiveness of the
enemy's radio communications by jamming their frequencies.
Movement Liaison
provided information on the movement of friendly aircraft, to
allow operation and filter rooms to correctly identify the tracks of friendly
aircraft, to prevent unnecessary air raid warnings and to prevent friendly fire
incidents.
Air Signal Intelligence ("Y" Service) intercepted enemy R/T and W/T signals to make
operational use of the information. In the case of seaborne landings, the small
units in the FDTs intercepted R/T used by fighters,
fighter/bombers and occasionally bombers. The information was immediately made
available to Fighter Controllers in plain language, where immediate action was
required.
By combining the intercepted messages and Direction Finding (D/F) bearings on
the transmissions made by the "Y" service with radar information, a fairly
complete picture emerged of the size of the formation, area of operation and
bases used by the enemy aircraft.
W/T intercept was not necessary on FDTs, since the information was usually
only of longer term strategic value. However, if required, the information could
be made available to seaborne forces by broadcasting it from a static "Y"
station.
Unlike the main HQ ships, the Assault HQ ships were in touch with troops
ashore. The troops provided information on targets and reported back on the
effectiveness of shelling for the benefit of the warships' gunners. The Assault
HQ ships could also direct minor craft and amphibian vehicles working between
the carrier ships, transports and the shore. The HQ ships also had links, through their air force
personnel, to the crews of fighter bombers and rocket firing aircraft. In turn,
they could be put in direct
radio contact with forward platoons and other junior commanders when specific
strikes were needed in support of advancing infantry and tanks.
As the invasion developed, the Assault HQ ships produced a stream of
directives for changes to the overall plan. For example, 'Bombarding' warships
were given new targets, reserve brigades in some cases were brought ashore more
quickly than planned and a host of minor changes including the provision of hot
food to landing craft crews and the replacement of lost equipment.
HMS Bulolo handled around 2,300 messages per day as they fine-tuned the
grand plan in the light of experience - rough weather,
bottlenecks on beaches caused by obstacles or enemy action, landings in the
wrong places due to navigational errors, breakdowns etc. Where the landings were
delayed or repositioned, it was vital that gunners, acting in support of the
advancing troops, were well aware of the changes to adjust the timing and
targeting of their bombardments. Whatever eventuality arose, the Assault HQ ships were expected to have an
alternative course ready to follow and to advise all interested parties,
including the Admiralty.
The Vessels
A variety of vessels were used, including Cruisers,
Gunboats, Frigates, Destroyers, Converted Passenger Vessels, Yachts and Landing
Craft. They were assigned to the Initial Assault Fleet to serve as Flagships,
Landing Ship HQ (LSH) and Control Vessels. Try Google for more information on
specific vessels.
Name + Type + Function + Movements
HMS
Albrighton
+ Hunt Class Destroyer
+ HQ Ship, Force G3 (Ferry Control) + As part of LSH Force G3 she departed from the Solent on 5 June, arriving off
Gold beach on D-Day in Assault Convoy G16B. From 8 June, her convoy duties
completed, she became an HQ Ship for the monitoring and control of 'ferry
craft', which plied the water between southern England and the Normandy
coast.
USS Ancon
[14,200T/1939] +
Cargo/Passenger ship of Panama Line + US
HQ Force O + Left Plymouth via the Rutland harbour anchorage on 5 June, arriving
off Omaha at 02.51 on D-Day in Assault Convoy 01.
USS Augusta
+ US Cruiser + US Flag Ship, Force O, Naval Commander, Western Task Force and
Bombardment Force Reserve Ship + Left Plymouth Sound Anchorage on 5 June
arriving off Omaha on D-Day in Assault Convoy O1A. Returned 25 June.
USS Bayfield
[8100T/1943] +
US Attack Transport (Troop Carrier) + HQ Ship Force U
+ Left Plymouth Sound anchorage at 09.43 on 5 June, and arrived off Utah at
02.29 as part of assault convoy U1A. Returned 25 June.
HMS Bulolo
[6,267T/1938] +
Liner of theAustralian Burns Philp line
+ HQ Ship Force G + As HMLSH Force G, she left Southampton at 17.10 and the Solent at 18.37 on 5
June, arriving off Gold beach at 05.56 on D-Day as part of Assault convoy
G9A. She sustained bomb damage near the Operations Room at 06.05 on 7 June
and superficial damage to her upper structure when rammed by the Empire Pitt
on 15 June. Also hit by an LCT at 10.10 on 27 June. Returned to Southampton
at 12.12 on 28 June.
MS Dacres
+ US Frigate + HQ Ship Force S2 + Left Portsmouth harbour 5 June. After embarkation off Newhaven, left 12.15,
arriving Sword 6 June in Assault Convoy S10. Assisted in the salvage of
James A Farrell on 29 June.
HMS
Goathland
1942 +
Destroyer (Hunt Class) + Temp HQ Ship Force S3
+ After embarkation from dockside left Portsmouth harbour at 13.20 on 5 June
arriving Sword on 6 June in Assault Convoy S5. Damaged by mine 24 July.
HMS Hilary
7,403T/1931 +
Liner + HQ Ship Force J. Flagship Eastern Task Force from 24 June
+ After embarkation at Southampton by tender, left Spithead
Gate 19.25 on 5 June, arriving Juno 05.58 on 6 June in Assault Convoy J11. Suffered slight
damage from a "near miss" bomb at 04.10 on 13 June.
HMS Kingsmill
+ US Frigate + HQ Ship Force G2. Ferry Control 19 June to 30th. + Embarkation at Southampton . Left Solent, arriving Gold 6 June as part of
Assault Convoy G10A.
HMS Largs
4,504T/1938 +
French Merchant Vessel
Charles Plumier,
later French/Vichy French Armed Merchant Cruiser (Captured by RN off Gibraltar).
+ HQ Ship Force S + From Portsmouth Harbour jetty left Solent 21.45 on 5 June, arriving Sword 6
June in Assault Convoy S7. Slightly damaged by mine at 00.45 on 25 June and
by gunfire at 18.30 on 28th. Returned to Solent on 30 June when Sword
beachhead was closed.
HMS Lawford
1943 +
US Frigate + Temp LS HQ Ship Force J1 + Embarkation at Southampton. Left Solent 5 June, arriving Juno 6 June, in
Assault Convoy J9. On 8 June broke in two following air attack with the loss
of 21 crew members and unknown Army personnel.
HMS Locust
[1939] +
Gunboat + Temp LS HQ Ship Force S1 + Left Portsmouth Harbour Jetty and Spithead Gate at 19.35 on 5 June, arriving
Sword 6 June in Assault Convoy S12. Damaged by gunfire 16 June (Approx).
HMS Lothian
[8036T/1938] +
Ellerman Liner City of Edinburgh + Reserve LS HQ
+ Left River Forth 6 June, arriving Harwich on 8th.
HMS Nith
[1942] +
Frigate + Temp HQ Ship Force G1 + Embarked Southampton, left Solent 5 June, arriving Gold 6 June in Assault
Convoy G9C. Damaged by bomb at 23.21 on 24 June.
HMS Royal Ulsterman
[3,244T/1936] +
Burns & Laird Cross Channel Ferry
+ LS HQ Ship Force J3. + Embarked at Southampton. Left Solent 16.00 5 June, arriving Juno 08.08 on 6
June in Assault Convoy J14. Carried 6 Landing Craft on outward trip. On 26
June became HQ Ship for Captain (north & southbound convoys).
St Adrian
[387T/ 1927] +
Yacht + HQ Ship Force S. Special Service (Ferry Control)
+ Left Portsmouth Harbour 5 Jun arrived Sword 6 June in Assault Convoy S5. On
June 6 rescued survivors from Svenner.
HMS Scylla
+Cruiser + Flagship Naval Commander Eastern Task Force
+ Left Portsmouth harbour 13.40 and Solent at
16.27 on 5 June. Arriving Sword
04.15 on 6 June. Damaged by mine 22.56 on 23 June while moving from Juno to
Sword. Towed by tugs Envoy & Thames to Solent. Not repaired.
HMS Waveney
[1942] +
Frigate + HQ Ship Force J2. (Ferry Control)
+ Embarked Southampton. Left Solent 5 June,
arriving Juno 6 June in Assault
Convoy J10.
9 Landing Craft
+ Landing Craft Control (LCC)
+ During the course of D-Day the following craft were assigned;
10,20,30,40,50,60,70,80. & 90.
11 Landing Craft +
Landing Craft HQ (LCH) + During the course of D-Day the following craft were assigned; 98, 100, 167,
168, 185, 187, 239, 245, 269, 275 & 317.
Depot Accommodation Control (Over Assault) Headquarters + Repair Ships, Craft
& Barges, Dredgers, Fireboats, Lightships and
Kitchen Barges. These were the Naval and Merchant
ships allocated to stationary tasks off the Normandy coast and UK waters
(Neptune duties). Try Google for more information on specific vessels.
The Vessels
USS Adonis
+US LST + Repair ship for landing craft. +
Departed Plymouth, via Weymouth Bay anchorage, arrived Omaha at 12.24 on 8
June for service at Mulberry A. Achelous Class
Landing Craft Repair Ship: Laid down as LST-83. Reclassified and
renamed USS
Adonis.
HMS Adventure +
HM Minelayer + Repair ship. + Left Solent anchorage on 7 June, arrived Gold at 08.30 on the 8th in Convoy EWP 1 for service on Mulberry
B. On 30th anchored inside Mulberry B.
HMS Albatross
[1928] +
HM Seaplane Carrier [Ex Australian Navy]
+ Repair ship. + Left Thames at 06.00 on 7 June, arrived Sword on 8th in Convoy ETM
2 for service at Gooseberry 5. Damaged by gunfire on the 23rd and
26th. Moved to Gold on the 29th.
HMS Ambitions
[1,849T/ 1913] +
Belgian Cross Channel Car Ferry + HM Minesweeper
+ Left Solent anchorage 13.30 on 9 June, arrived in assigned anchorage in
Eastern Task Force Area on the 12th.
HMS Aorangi
[17,491T/ 1924] +
New Zealand Liner + Depot ship for tugs.
+ Left Liverpool 29 April, arrived Solent anchorage 5 May. Replaced by Empress
of Russia in July.
HMS Aristocrat
[544 Tonne 1935] +
Clyde Passenger Vessel (Paddle Steamer) + HM HQ Ship (Mulberry B)
+ Left Solent anchorage, arrived Gold 08.30 on the 7th in Convoy EWC 1B.
Ascanius
[10,048T/ 1910] +
Passenger/Cargo Vessel + Depot Ship + Left Thames 06.00 on 7 June, arrived Juno 10.22 on 8 June in Convoy ETM 2 for
service at Gooseberry 4.
USS Atlas
US LST + Repair Ship for Landing Craft + Ex Falmouth. Left Plymouth 7 June. Arrived Utah for service on Gooseberry 1.
HMS Bachaquero
[4,890T/1937] +
HMLST (1) + Tank & Truck Ferry then Rhino Depot Ship.
+ Loaded Tilbury, London and left for Eastern Task Force Area. Carrying
capacity 18 tanks or 33 trucks and 207 troops. After unloading cargo became
Rhino Depot Ship on 8 June. Damaged by gunfire on the 14th and by mine on
the 23rd. Returned UK on 28th. Sometimes referred to as Bachachero. Had the
distinction of being the first ever Tank Landing Ship.
Ben Tarbert
+ Minesweeper
Ex Trawler + HM Depot Trawler + Left Solent arrived Omaha 11 June, in Convoy EBC5W.
Bernard Carver
[7,191T/1942] +
US Liberty Ship + Depot Ship + Left Barry and Bristol Channel 5 June at 11.30. Arrived Western Task Force
Area 08.00 on the 11th in Convoy EBM 2.
Calshot
[679T/1930] +
Southampton/IOW Ferry + Landing Craft Engineering and Maintenance
+ In Solent in support of Force J (Juno).
Cap Tourane
[8,009T/1923] +
French Passenger Vessel + Depot Ship. + Left Thames 06.00 on 7 June, arrived Sword 8th in Convoy ETM 2 for service on
Gooseberry 5. Damaged by gunfire on 22nd & 25th. Moved to Gold on 29th.
HMS Capetown +
HM Cruiser + Depot Ship + Ex Falmouth via Weymouth Bay to Omaha at 08.30 on 7 June in Convoy EBP 1 for
service on Mulberry A.
HMS Ceres +
HM Cruiser + Depot Ship + Ex Falmouth via Weymouth Bay, arrived Utah 08.30 on 7 June in Convoy EBP 1
for service on Gooseberry 1.
USS Chimo +
US Auxiliary Minelayer + Minesweeper Depot Ship
+ Left Plymouth 09.00 on 6 June. Arrived Utah 08.00 on 7th in Convoy EBM 2.
HMS Danae
[1918] +
HM Cruiser + Depot Ship + Normandy 12 June to 15 Aug. To Polish Navy 4 Oct 44.
HMS Despatch +
HM Cruiser + HQ Base & AA Defence Ship
+ Left Solent 23.10 on 7 June. Arrived Gold 09.30 on 8 June in Convoy EWP 1.
Dredgers
+The following dredgers were deployed: Dm Dredge No 16; From Foulney H+B Ry
Dredger No 4 and James Nos 4, 32, 36, 46 & 67; From Ramsgate, Red No 6,
Rossall, TB, Taylor, TCC
Hopper No 1, TIC Nos
18 & 19 and Tolverne.
SS Eleazer Wheelock
[7,191T/1942] +
US Liberty Type + Accommodation Ship + Left Barry 5 June & Bristol Channel at 11.30, arrived Omaha 08.00 on 7 June
in Convoy EBM 2 for service at Mulberry A.
Fireboats +
DEW (?) for Gold Beach, MH
Stephen left Solent 19.00 on 5 June for Juno in Assault Convoy J15.
HMS Fratton
[757T/1925] +
Southern Rail Vessel + Bombardon Control Ship later Accommodation Ship
+ Left Weymouth Bay 4 June for Selsey, arrived Gold 7 June in Follow Up Convoy
LS/ETM 1.. Returned to Portland 21 June, later to serve as Normandy
Accommodation ship. Sunk 18 Aug with loss of 31 crew members.
HMS Frobisher
[1920] +
Cruiser + Training & Depot Ship + After Bombardment task was Depot Ship at Mulberry B. Torpedoed off
Courseilles 9 Aug. Returned to UK 15 Aug.
George D Irvine
+Trawler (?) + HM Depot Trawler + Initially at Solent arrived Sword 23 Jun.
George W Woodward
[7,176T/1943] +
US Liberty Type + Depot Ship + Left Cardiff 5 June via Solent, arrived Gold 8 June in Convoy EBM 3 for
service to Personnel Manning US Landing Craft.
HMS Haslemere
[756T/1925] +
Southern Railway Vessel + HM Mulberry Control & Receiving Ship
+ Arrived Gold 7 June in Follow Up Convoy L5/ETM1. Receiving ship at Mulberry
B for Bombardons, Phoenix and Whales. Also Plankers and Sappers HQ.
HMS Hawkins
[1917] +
Ex Cruiser Training Ship + Spare Depot Ship
+ June 1944, Western Task Force Gunfire Support Bombardment Force A for Utah
Beach.
Isle of Thanet
[1925] +
Passenger Vessel + Control Ship + Ferry Control HQ Ship for Force J. In late summer of 1944 reverted to
cross channel trooping.
Kelanthan
[11,106T/1921] +
Ferry in Singapore Straits + Depot & Repair Ship
+ For Minesweepers and Anti Submarine Trawlers anchored in Solent.
Lightships +
Juno and Kansas ex Thames positioned 18 June.
LSE 1
US Landing Ship Tank (LST) + Landing Ship Emergency Repair (LSE)
+ In reserve at Plymouth. On 23 June sailed from Solent for service in Eastern
Task Force Area.
LSE 2
US LST + Landing Ship Emergency Repair + Ex Solent for Juno.
USS Melville +
US Destroyer Tender + Landing Craft Emergency Repair
+ Ex Weymouth, arrived Juno 12 June. Beginning in May 1944 she helped
minesweepers and landing craft as they got ready for the June invasion of
Normandy. For the next year she was busy maintaining and repairing landing
craft for the Allied push toward Germany.
USS Miantonomah +
US Minelayer + Task Force HQ Ship + Western Task Force area 25 June in Convoy ECP15. Embarked Rear Admiral John
Wilkes and became flagship for CTF 125. She steamed to Cherbourg 9 July and
on the 18th, Admiral Wilkes hauled down his flag prior to Miantonomah's
departure to England to carry supplies for port clearance operations. Sunk
25/9 with the loss of 58 crew.
HMS Misoa
[1937] +
Landing Ship + Rhino Depot Ship
+ British Assault Area, Mulberry B Rhino.
Northland
[1911] +
US Lend/Lease Vessel + Accommodation Ship
+ Western Task Force Area 8th June in Convoy EBC2Y.
President Warfield
[4,273T/1928] +
US Vessel + US Accommodation Ship + Ordered to leave Bristol Channel 23 Jun for service at Omaha in July.
Queen of Kent
[798T/1916] +
New Medway Excursion Vessel + Accommodation & Despatch Control Ship
+ Mulberry Accommodation & Despatch Control Ship at Peel Bank, Isle of Wight
from 3 to 15 June then Dungeness.
Queen of Thanet
[798T/1916] +
New Medway Excursion Vessel (Paddle Steamer)
+ Despatch & Control Ship + Mulberry Despatch Control at Selsey then Peel Bank, Isle of Wight from 24
June. Built as the minesweeper HMS Melton for the Royal Navy in the
Great War and later converted for passenger use.
HMS Scawfell
[1937] +
Clyde Paddle Steamer + Minesweeper + Mulberry Control Ship &
Accommodation Ship
HMS Skiddaw
[483T/1896] +
Excursion Vessel + HQ Ship + Left Dungeness on 14 June for Peel Bank, Isle of Wight for service until 24
June.
HMS Southern Prince
[10,917T/1929] +
Auxiliary Minelayer + Accommodation/Temp HQ Ship
+ Left Solent 23.05 on 7 June, arrived Juno 8th in Convoy EWP1. After October
1944, she was used as accommodation ship and ended the war as a fleet
training ship in the Pacific. 1945 returned to owner.
Southland
[1908] American Lend/Lease
+ Accommodation Ship + Western Task Force.
Star of Freedom
[1917] +
HM Trawler Depot Ship + Left Solent, arrived Utah 24 June in Convoy ECB17W.
HMS Tasajera
[1938] +
Landing Ship Tank + Depot Ship + Rhino Depot Ship from 8 June. Grounded in gale 19 June.
Thomas B Robertson
[7,176T/1942] +
US Liberty Type + Accommodation Ship + Left Barry 5 June via Solent arrived Utah 8th in Convoy EBM3 for service at
Gooseberry 1.
Thomas Johnson
[7,176T/1942] +
US Liberty Type + Depot Ship + Left Clyde 13 June via Milford Haven arrived Utah 1 July, in Convoy ECN19P.
Thysville
[8,351T/1922] +
Belgian Vessel + Depot Ship + Left Thames 06.00 on 7 June, arrived Gold at 12.00 on 8 June in Convoy ETM2
for service at Mulberry B .
Tyne +
Depot Ship + For fleet Destroyers and Escorts. Left Scapa Flow 07.42 on 1 June, arrived
Solent 09.00 June 5.
With the introduction of the Fighter Direction Tenders
(FDTs), the usefulness of the HQ ships, from the RAF point of view, was diminished.
A reduction in personnel and equipment was recommended. However, they did
provide useful visual information on low flying enemy aircraft to the FDTs
and thereby to the low cover fighter aircraft of the Allies. This resulted
in the interception and destruction of three enemy aircraft.
The air situation plot required by the Commodore of each Assault Force
could be adequately provided by information from the FDTs, whose radar was
superior and who had access to the same information sources as the HQ ships.
It was suggested that the filter room on the HQ ships and their personnel
could be "eliminated".
Since the HQ ships would most likely never take over control of the
Fighter cover from the FDTs, it was suggested that "controlling personnel" be
removed from the HQ ships or substantially reduced to two Controllers and
two Deputy Controllers.
In view of the superior radar and comprehensive communications equipment,
it was recommended that the FDTs should initiate Air Raid Warnings with the
HQ ships giving warnings in their own assault areas.
Two separate channels of communications between the HQ ships and FDTs
were essential 24/7, one for plotting and the other for liaison.
2 Diverting Fighters from pre determined missions.
Fighters engaged on direct support were given specific targets before take
off. En route, they were instructed to radio the HQ ship in the area they
were over-flying, to enable the Air Staff Officer, or Controller, on board to
divert them to targets of opportunity. However, in the event there were few
occasions when aircraft were available and, even when they were, the Army
staff had no clear picture of battleground conditions to allow them to
identify suitable targets.
3 Ensuring appropriate high level Army Representation on HQ Ships
An Army officer of sufficient rank should remain on board each HQ ship to
represent the views of the Divisional Commander until the ship ceases to act
as forward control of the Fighter/Bomber forces. The absence of the Military
Commander, and all his senior staff who had gone ashore after H+6,
contributed to the ineffectiveness of this part of the operation. The
remaining Army personnel had insufficient rank and experience to represent
the Army point of view. In future operations involving heavy Air Support for
the Army it was recommended that the Army should have adequate
representation on board the HQ ship until they had handed over control to
shore based establishments.
4 Intelligence Gathering
It was strongly recommended that a full "Y" team be onboard the HQ ships.
5 Training and Familiarisation
The HQ ships should arrive in the assault area three months prior to an
action to allow time to train many hundreds of people, from different
disciplines and geographical locations, to be trained in their own jobs and
to have an understanding of the roles of others they are likely to deal
with.
6 Preparation Time
Officers in charge of the Air Section of HQ ships should be briefed a month
in advance of the action to allow time for them to select maps they require
and to make preparations that cannot satisfactorily be left to the last
minute.
7 Knowledge Update
RAF personnel with 18 months continuous service on ships should be given
the option of transfer to land stations to update their knowledge.
8 Naval Assault Radar
The Naval Assault radar reporting had little value without a Movement
Section to identify the tracks.
9 Ceiling on Personnel Numbers
A pre-determined limit on the number of Army and RAF personnel should be set
and adhered to. Many last minute additions were embarked causing
overcrowding, discomfort and the risk of heavy casualties in the event of
damage or sinking.
10 HQ Standby Ships
During the Normandy landings there were three vessels on standby as HQ
ships; HMS Allbrighton, HMS Royal Ulsterman and HMS Dacres.
They were never called upon to undertake the duties and, in hindsight, the
Allbrighton and the Dacres were judged to be too small for the
task. If they were considered necessary, they should be large enough to
accommodate 25 RAF personnel with equipment to receive the FDT plotting
wave, the FDT liaison wave, the Air Command wave, the Air Base wave and the
three Aircraft waves.
11 Approaching Allied Aircraft Alerts
To reduce the risk of Allied aircraft being shot down by friendly fire an
enlarged Movement Liaison Section had been established in No 11 Group Filter
Room at Stanmore. They transmitted by wireless telegraphy coded messages to
HQ ships, FDTs and Operations Rooms on the far shore (as opposed to the home
shore). When the aircraft were 10 minutes flying time from the beaches, one
HQ ship broadcast warnings of the approach of friendly aircraft on the Joint
Forces frequency. This was particularly effective in the case of low flying
aircraft but only when the messages were received and acted upon by all
ships.
12 Spotter Plane
In an area thought to have little significance, the HQ ships performed an
important role. Spotter planes working with bombardment ships (reporting on
targets and the accuracy of shell-fire) were, in many cases, unable to speak
directly to the ships concerned. In these circumstances, the pilots were
advised to radio the nearest HQ ship for instructions. The HQ ships provided
a communication link to the bombarding ships or otherwise returned them to
base with their missions unfulfilled. At times there were too many spotter
craft over the anchorage area and it was difficult to co-ordinate their
deployment to the bombarding ships available.
There are around 300 books
listed on our 'Combined Operations Books' page which can be purchased on-line
from the Advanced Book Exchange (ABE) whose search banner checks the shelves of
thousands of book shops world-wide. Type in or copy and paste the title of your
choice or use the 'keyword' box for book suggestions. There's no obligation to
buy, no registration and no passwords. Click
'Books' for more information.
Acknowledgments
Written by Geoff Slee from research material provided by Phill Jones from the
following sources;
1) Mountbatten. The Official Biography by P Ziegler.
2) The Watery Maze by Bernard Fergusson.
3) Combined Operations 1940 - 1942. HMSO booklet.
4) The Greatest Air Battle by Norman Franks.
5) Shore Establishments of the Royal Navy by Lt Cdr B Wardlow RN.
6) PRO-WO244/12; The Role and Operation of HQ Ships During the Assault on the
Continent of Europe.
7)The Largs Association (Mike MacKenzie).
8) The late Sid Windebank, LAC RAF on HMS Largs.
9) Mr Fred Earney, LAC RAF on HMS Largs.
10) Mr Jim Rolt, brother of Tommie Rolt Ex HMS Largs, KIA when FDT 216 sank.
11) Various Internet websites.
If you have any information about or photos of WW2 HQ Ships please contact
us. Any material, no matter how small could be of interest.
News & Information
About
Us
Background to
the website and memorial project and a look to the future; plus
other small print stuff and website accounts etc.
Click
here for information.
Pay
a personal tribute to veterans who served in, or alongside, the
Combined Operations Command in WW2 by adding their details and
optional photo to our
Roll of Honour or
They Also Served pages on this
website, which include the Combined Operations prayer.
Facebook
Visit
our Facebook page about
the Combined Operations Command in appreciation of our WW2 veterans.You are welcome to add information,
photos and comment or reply to messages posted by others.
Events
and Places to Visit
Organisers:
Reach the people who will be interested to know about your Combined
Operations or war related event by adding it to our webpage
free of charge.
Everyone else:
Visit our webpage for information on events and places to visit. If
you know of an event or place of interest, that is not listed,
please let us know. To notify an
event or place of interest,
click here.
To visit the webpage
click here.
Find
Books of Interest
Search for Books direct from our
Books page. Don't have the name of a book in mind? Just type in a
keyword to get a list of possibilities... and if you want to
purchase you can do so on line through the Advanced Book Exchange
(ABE).
Combined
Operations
Handbook (Far East)
The handbook
was prepared for Combined Operations in the Far East. It illustrates
the depth and complexity of the planning process necessary to ensure
that the 3 services worked together as a unified force.